手机归属地查询
本文从一个简单的手机归属地查询实现入手,来帮助你入门
小程序
开发。
源码
基本功能如下:
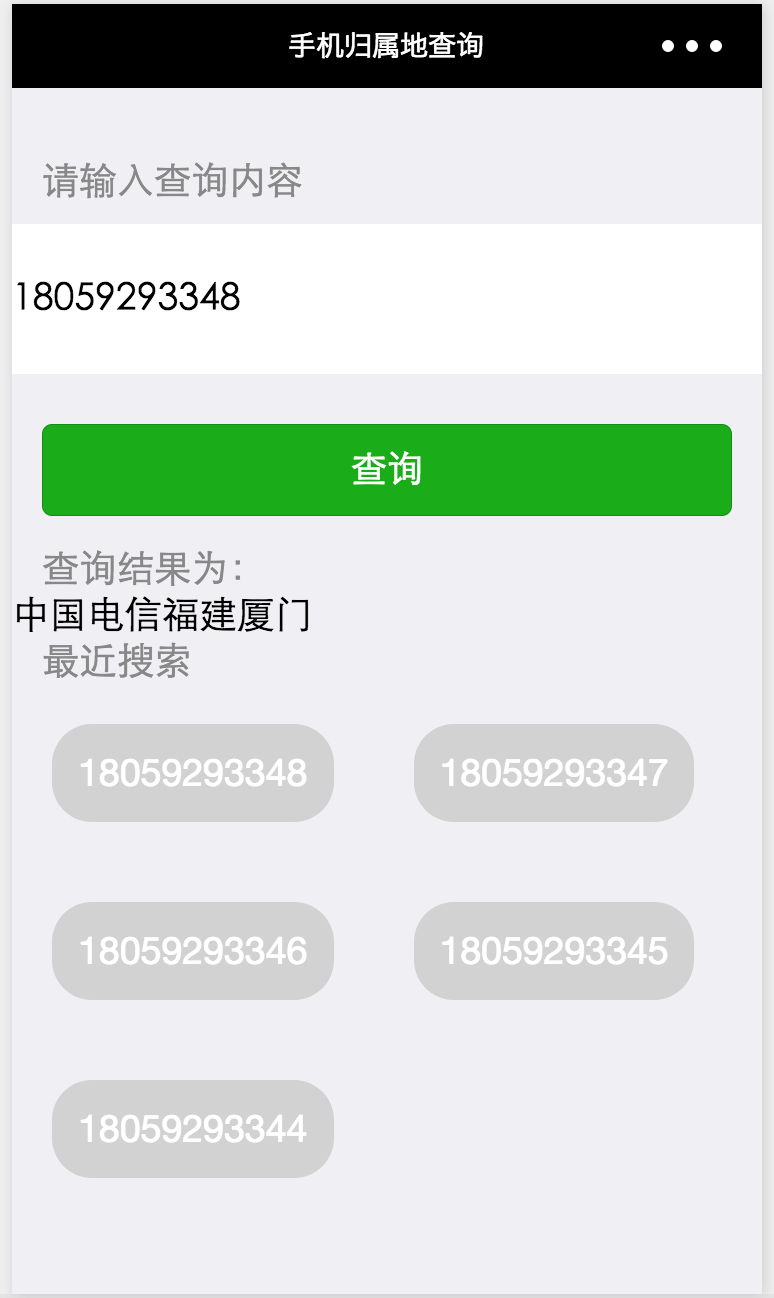
界面预览
初始化
创建空白项目
新建一个空白项目
-
AppID 可选择无
-
不选择中创建 quick start 项目,而是创建空白项目,加深对小程序结构的理解。
基本配置
首先,创建全局配置文件 app.json
/app.json
{
  "pages":[
    "pages/index/index"
  ]
}
在全局配置文件中,定义了一个页面。保存之后,将会自动生成 index 页面的基本目录。
pages
└── index
├── index.js
├── index.json
├── index.wxml
└── index.wxss
现在,还缺少一个应用的入口文件,用来注册小程序
/app.js
App({
})
App() 方法用来注册一个小程序。到这一步,小程序初始化就完成了。
功能实现
页面配置
首先,我们来为页面添加顶部导航文字
/pages/index/index.json
{
  "navigationBarTitleText": "手机归属地查询"
}
查询模块
接下来是查询模块
/pages/index/index.wxml

<view>
  <text>请输入查询内容text>
  <input type="number" bindinput="bindPhoneInput" value="{{ phoneNumber }}"/>
  <button type="primary" bindtap="queryPhoneInfo" disabled="{{ disabled }}">查询button>
view>
说明
-
bindinput 用于绑定键盘输入事件 - 用户输入时,将会调用绑定bindPhoneInput 函数
-
bindtap 用于绑定点击事件 - 用户点击按钮后,将会调用绑定的 queryPhoneInfo 函数
-
按钮是否可点击取决于
disabled 的值;
接下里是具体的功能实现,首先,我们把手机归属地查询的功能封装到全局业务文件 app.js 中,方便不同页面使用
/app.js
App({
  /**
   * 获取手机归属地信息
   */
  getPhoneInfo(phoneNum, callback) {
    wx.request({
      url:
      'https://www.iteblog.com/api/mobile.php?mobile=' + phoneNum,
      header: {
        'content-type': 'application/json'
      },
      success: function (res) {
        callback(res.data);
      }
    })
  }
})
说明
-
使用小程序提供的
wx.request 发送请求;
-
该函数接受两个参数,一个是手机号,另外一个则是自定义函数,用来处理查询的结果。
在页面里面实现刚才定义的两个事件
/pages/index/index.js
var app = getApp();
Page({
data: {
phoneNumber: null,
phoneInfo: null,
disabled: true
},
bindPhoneInput(event){
this.setData({
phoneNumber: event.detail.value,
phoneInfo: null
})
this.setDisabled();
},
setDisabled() {
this.setData({
disabled: (this.data.phoneNumber && this.data.phoneNumber.toString().length === 11) ? false : true
})
},
queryPhoneInfo() {
app.getPhoneInfo(this.data.phoneNumber, data => this.setData({
phoneInfo: data
}));
}
})
说明
-
data 用于管理该页面的数据;
-
this.setData() 方法用于设置 data 的属性,如果直接使用 this.data.phoneInfo 无法改变页面状态;
-
在页面中调用
app 的方法,需要先使用 getApp 进行实例化,然后通过实例来访问方法;
查询结果显示
接下来在视图里面显示查询结果
/pages/index/index.wxml


<view>

  <view wx:if="{{ phoneInfo }}">
   <text>查询结果为:text>

   <text wx:if="{{phoneInfo.ret === 0}}">
   {{phoneInfo.operator}}{{phoneInfo.province}}{{phoneInfo.city}}
   text>

  <text wx:else> {{phoneInfo.msg}} text>
  view>
view>
说明 - 使用 wx:if 与 wx:else 可以方便的根据查询结果来切换视图
最近搜索功能实现
最后是最近功能记录的功能实现,首先是视图
<view>
  <text>最近搜索text>
  <view>
    <view wx:for="{{ historyList }}"  bindtap="selectHistory" data-number="{{item}}">
       {{item}}
    view>
  view>
view>
说明:
-
遍历
historyList 数组
-
用户点击某一记录时候,触发
selectHistory 事件
-
将每条手机号保存到
data-number 中,selectHistory 就可以获取对应的手机号了
业务逻辑
var app = getApp();
Page({
data: {
phoneNumber: null,
phoneInfo: null,
historyList: [],
disabled: true
},
bindPhoneInput(event){
this.setData({
phoneNumber: event.detail.value,
phoneInfo: null
})
this.setDisabled();
},
setDisabled() {
this.setData({
disabled: (this.data.phoneNumber && this.data.phoneNumber.toString().length === 11) ? false : true
})
},
queryPhoneInfo() {
app.getPhoneInfo(this.data.phoneNumber, data => this.setData({
phoneInfo: data
}));
this.addQueryHistory(this.data.phoneNumber);
},
addQueryHistory(phoneNumber) {
var historyList = wx.getStorageSync('historyList') || [];
if (historyList.indexOf(phoneNumber) === -1) {
historyList.unshift(phoneNumber);
wx.setStorageSync('historyList', historyList);
}
this.setData({
historyList: historyList
})
},
onLoad: function () {
this.setData({
historyList: wx.getStorageSync('historyList') || []
})
},
selectHistory(event) {
this.setData({
phoneNumber: event.currentTarget.dataset.number,
disabled: false
})
}
})
界面美化
最后,只需要美化下界面即可。
视图
<view class="querySection">
  <text class="help-text">请输入查询内容text>
  <input class="queryInput" type="number" bindinput="bindPhoneInput" value="{{ phoneNumber }}"/>
  <button class="queryBtn" type="primary" bindtap="queryPhoneInfo" disabled="{{ disabled }}">查询button>
view>


<view>
  <view wx:if="{{ phoneInfo }}">
  <text class="help-text">查询结果为:text>

   <text wx:if="{{phoneInfo.ret === 0}}">
   {{phoneInfo.operator}}{{phoneInfo.province}}{{phoneInfo.city}}
   text>

  <text wx:else> {{phoneInfo.msg}} text>
  view>
view>


<view>
  <text class="help-text">最近搜索text>
  <view class="items">
    <view class="item" wx:for="{{ historyList }}"  bindtap="selectHistory" data-number="{{item}}">
       {{item}}
    view>
  view>
view>
样式
page {
background-color: #EFEFF4;
font-family: -apple-system-font,Helvetica Neue,Helvetica,sans-serif;
}
.querySection {
display: flex;
flex-direction: column;
margin-top: 35px;
}
.help-text {
font-size:14pt;
color:#888888;
margin-left:15px;
}
.queryInput {
width:100%;
background-color: #FFFFFF;
height: 75px;
margin:10px auto;
}
.queryBtn {
margin:15px;
}
.items {
display: flex;
flex-wrap: wrap;
}
.item {
margin:20px;
background-color: #D2D2D2;
邀请


