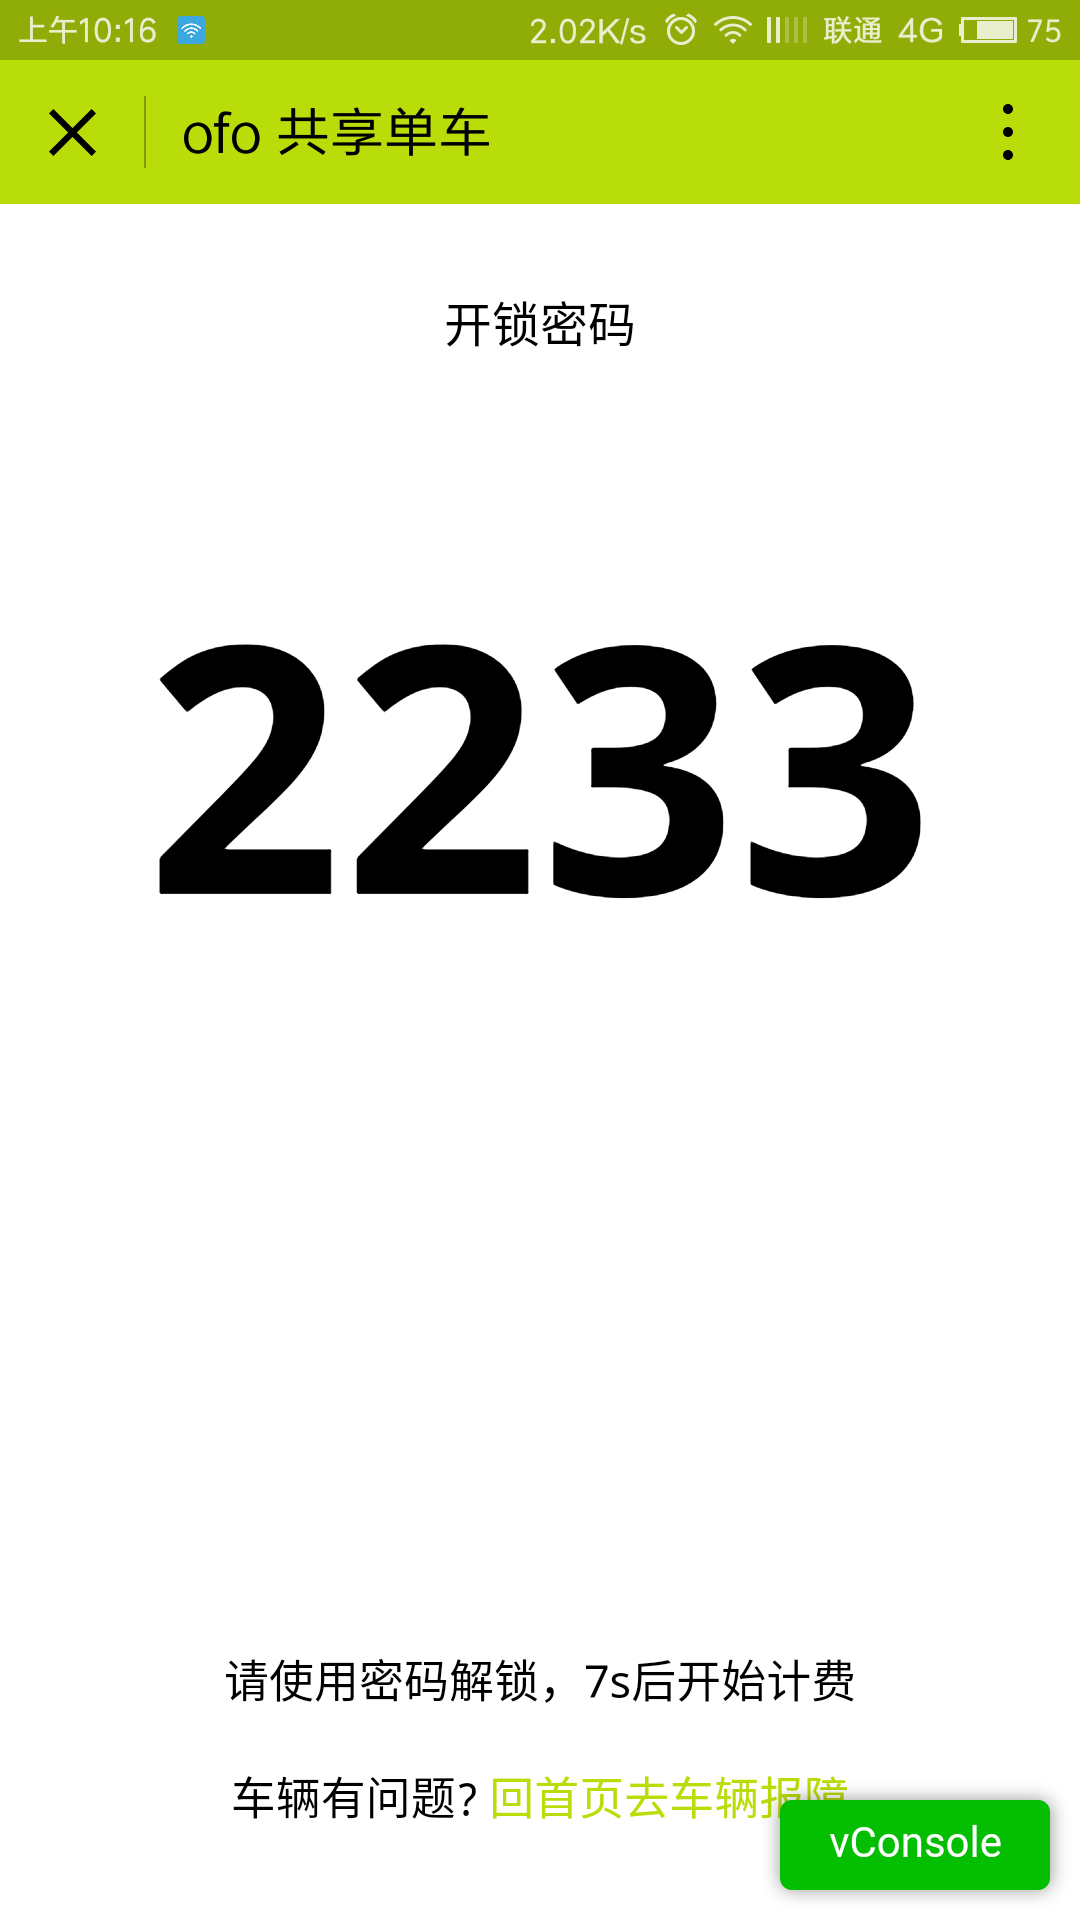
获取了密码的页面
页面分析
1.后台需要拿到开锁密码,然后显示在页面上
2.我们需要一个定时器,规定多长时间用来检查车辆,这期间可以点击回首页去车辆报障链接,当然也就取消了本次扫码。
3.检查时长完成后,自动跳转到计费页面
1.页面布局
<view class="container">
<view class="password-title">
<text>开锁密码</text>
</view>
<view class="password-content">
<text>{{password}}</text>
</view>
<view class="tips">
<text>请使用密码解锁,{{time}}s后开始计费</text>
<view class="tips-action" bindtap="moveToWarn">
车辆有问题?
<text class="tips-href">回首页去车辆报障</text>
</view>
</view>
</view>
2.页面样式
.container{
    width: 100%;
    display: flex;
    flex-direction: column;
    align-items: center;
    justify-content: space-between;
    background-color: #fff;
}
.password-title,.tips{
    width: 100%;
    flex: 1;
    text-align: center;
    padding: 60rpx 0;
}
.password-content{
    width: 100%;
    flex: 8;
    text-align: center;
    font-size: 240rpx;
    font-weight: 900;
}
.tips{
    font-size: 32rpx;
}
.tips .tips-action{
    margin-top: 20rpx;
}
.tips .tips-href{
    color: #b9dd08
}
3.页面数据逻辑
Page({
data:{
time: 9
},
onLoad:function(options){
this.setData({
password: options.password
})
let time = 9;
this.timer = setInterval(() => {
this.setData({
time: -- time
});
if(time = 0){
clearInterval(this.timer)
wx.redirectTo({
url: '../billing/index?number=' + options.number
})
}
},1000)
},
moveToWarn: function(){
clearInterval(this.timer)
wx.redirectTo({
url: '../index/index'
})
}
})
注意:这里的this.timer不会被传参到pages/index/index.js里的onload函数里,被传参到首页的定时器是计费页的定时器,后面会讲到
tips: onload函数参数说明: options的值是扫码成功后请求服务器获取的单车编号和开锁密码
case 2: if(this.timer === "" || this.timer === undefined){
wx.scanCode({
success: (res) => {
wx.showLoading({
title: '正在获取密码',
mask: true
})
wx.request({
url: 'https://www.easy-mock.com/mock/59098d007a878d73716e966f/ofodata/password',
data: {},
method: 'GET',
success: function(res){
wx.hideLoading();
wx.redirectTo({
url: '../scanresult/index?password=' + res.data.data.password + '&number=' + res.data.data.number,
success: function(res){
wx.showToast({
title: '获取密码成功',
duration: 1000
})
}
})
}
})
}
})
}else{
wx.navigateBack({
delta: 1
})
}
break;
onload: function(options){
console.log(options);
}
6.编写计费页(billing文件夹)
上节中我们设置了计时器完成后,跳转到计费页,它是酱的:
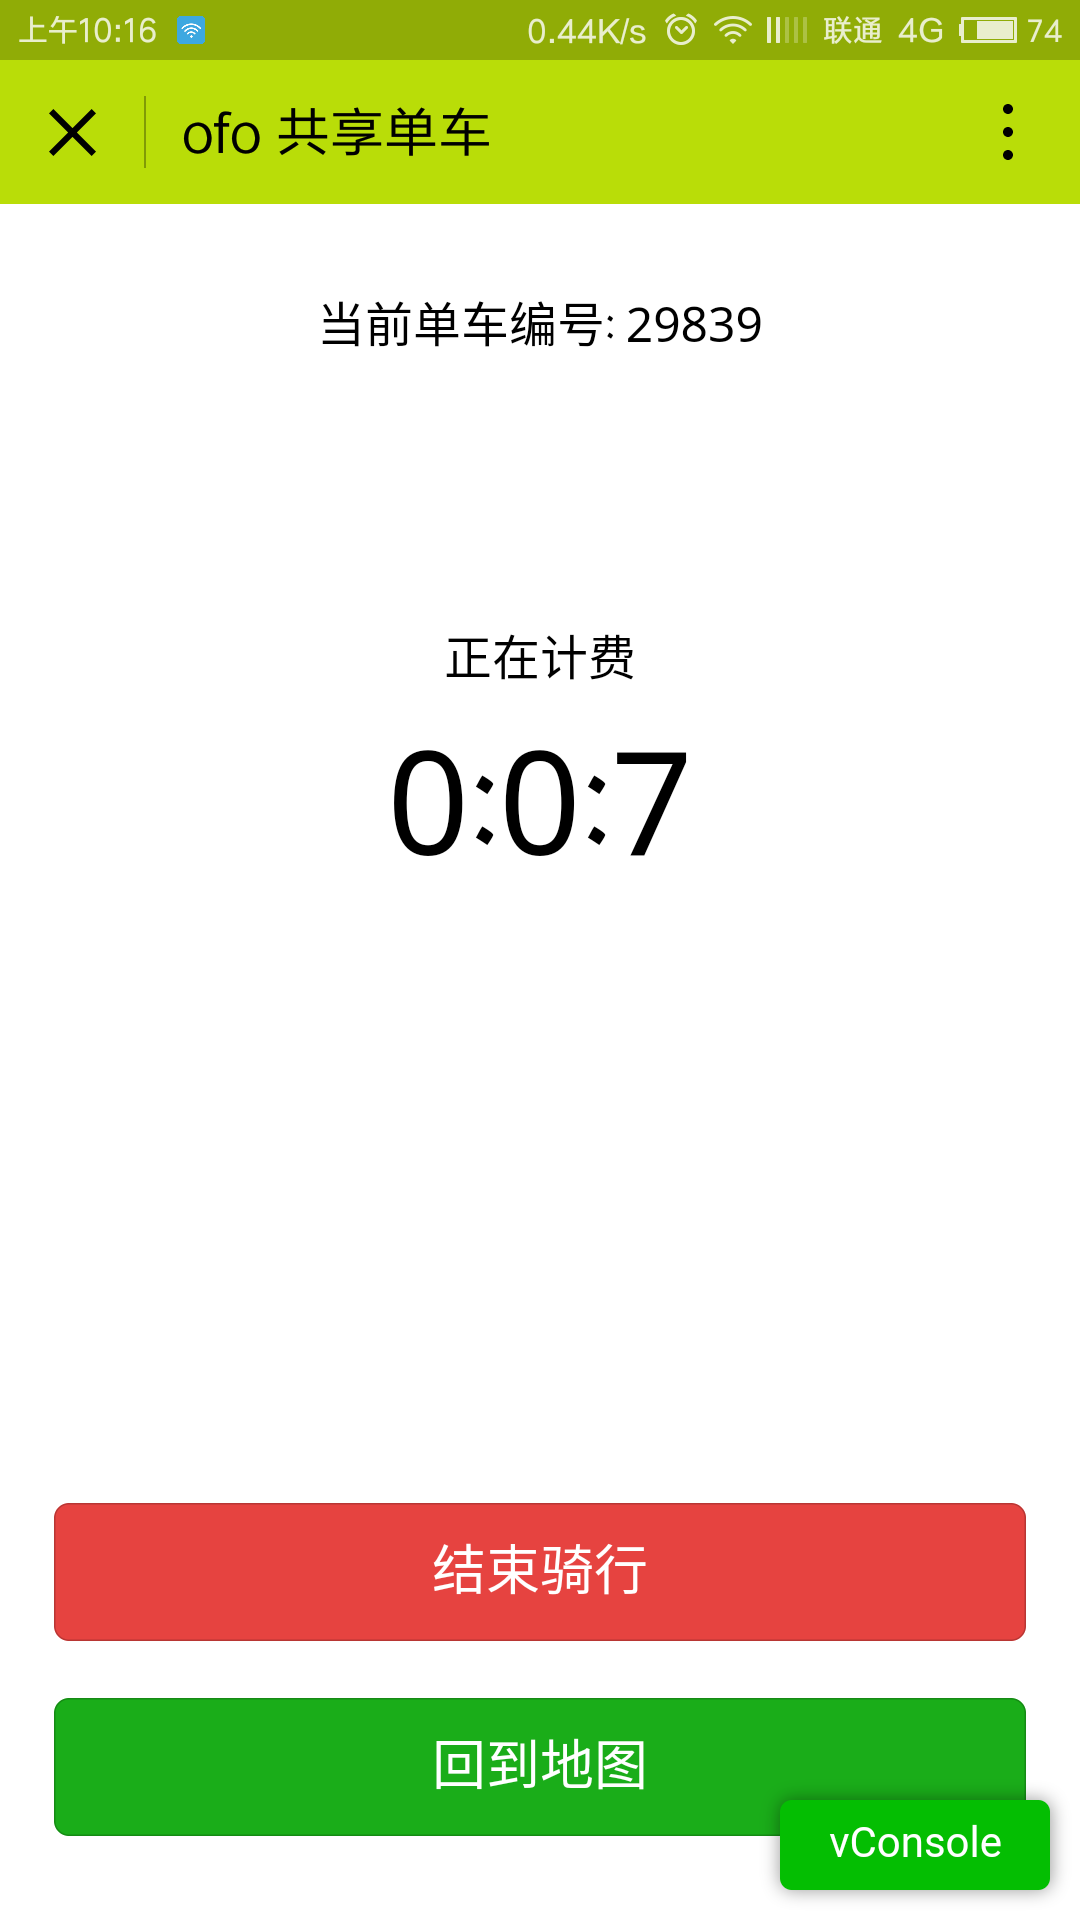
计费页
页面分析:
1.后台需要拿到单车编号,并显示在页面上
2.我们需要一个计时器累加骑行事件用来计费,而且可以显示最大单位是小时
3.两个按钮:结束骑行,回到地图 。其中,点击结束骑行,关闭计时器,根据累计时长计费;点击回到地图,如果计时器已经关闭了,就关闭计费页,跳转到地图。如果计时器仍然在计时,保留当前页面,跳转到地图。
4.点击回到地图会把计时器状态带给首页,首页做出判断,判定再次点击立即用车响应合理逻辑(已经在计费,不能重复扫码。已经停止计费了,需要重新扫码)
1.页面结构
<view class="container">
<view class="number">
<text>当前单车编号: {{number}}</text>
</view>
<view class="time">
<view class="time-title">
<text>{{billing}}</text>
</view>
<view class="time-content">
<text>{{hours}}:{{minuters}}:{{seconds}}</text>
</view>
</view>
<view class="endride">
<button type="warn" disabled="{{disabled}}" bindtap="endRide">结束骑行</button>
<button type="primary" bindtap="moveToIndex">回到地图</button>
</view>
</view>
2.页面样式
.container{
    width: 100%;
    display: flex;
    flex-direction: column;
    align-items: center;
    justify-content: space-between;
    background-color: #fff;
}
.number,.endride{
    padding: 60rpx 0;
    flex: 2;
    width: 100%;
    text-align: center;
}
.time{
    text-align: center;
    width: 100%;
    flex: 6;
}
.time .time-content{
    font-size: 100rpx;
}
.endride button{
    width: 90%;
    margin-top: 40rpx;
}
3.页面数据逻辑
Page({
data:{
hours: 0,
minuters: 0,
seconds: 0,
billing: "正在计费"
},
onLoad:function(options){
this.setData({
number: options.number,
timer: this.timer
})
let s = 0;
let m = 0;
let h = 0;
this.timer = setInterval(() => {
this.setData({
seconds: s++
})
if(s == 60){
s = 0;
m++;
setTimeout(() => {
this.setData({
minuters: m
});
},1000)
if(m == 60){
m = 0;
h++
setTimeout(() => {
this.setData({
hours: h
});
},1000)
}
};
},1000)
},
endRide: function(){
clearInterval(this.timer);
this.timer = "";
this.setData({
billing: "本次骑行耗时",
disabled: true
})
},
moveToIndex: function(){
if(this.timer == ""){
wx.redirectTo({
url: '../index/index'
})
}else{
wx.navigateTo({
url: '../index/index?timer=' + this.timer
})
}
}
})
页面分析的第4步,主要实现在moveToIndex函数里。结束骑行之后,设置定时器值为空,在点击回到地图时判断计时器的状态(值是否为空)。如果为空,关闭计费页,结束本次骑行。如果不为空,携带定时器状态跳转到首页,首页立即用车点击事件就会对传过来的参数(计时器状态)响应合理逻辑。
7.编写维修报障页(warn文件夹)
点击举报控件,页面是酱的:
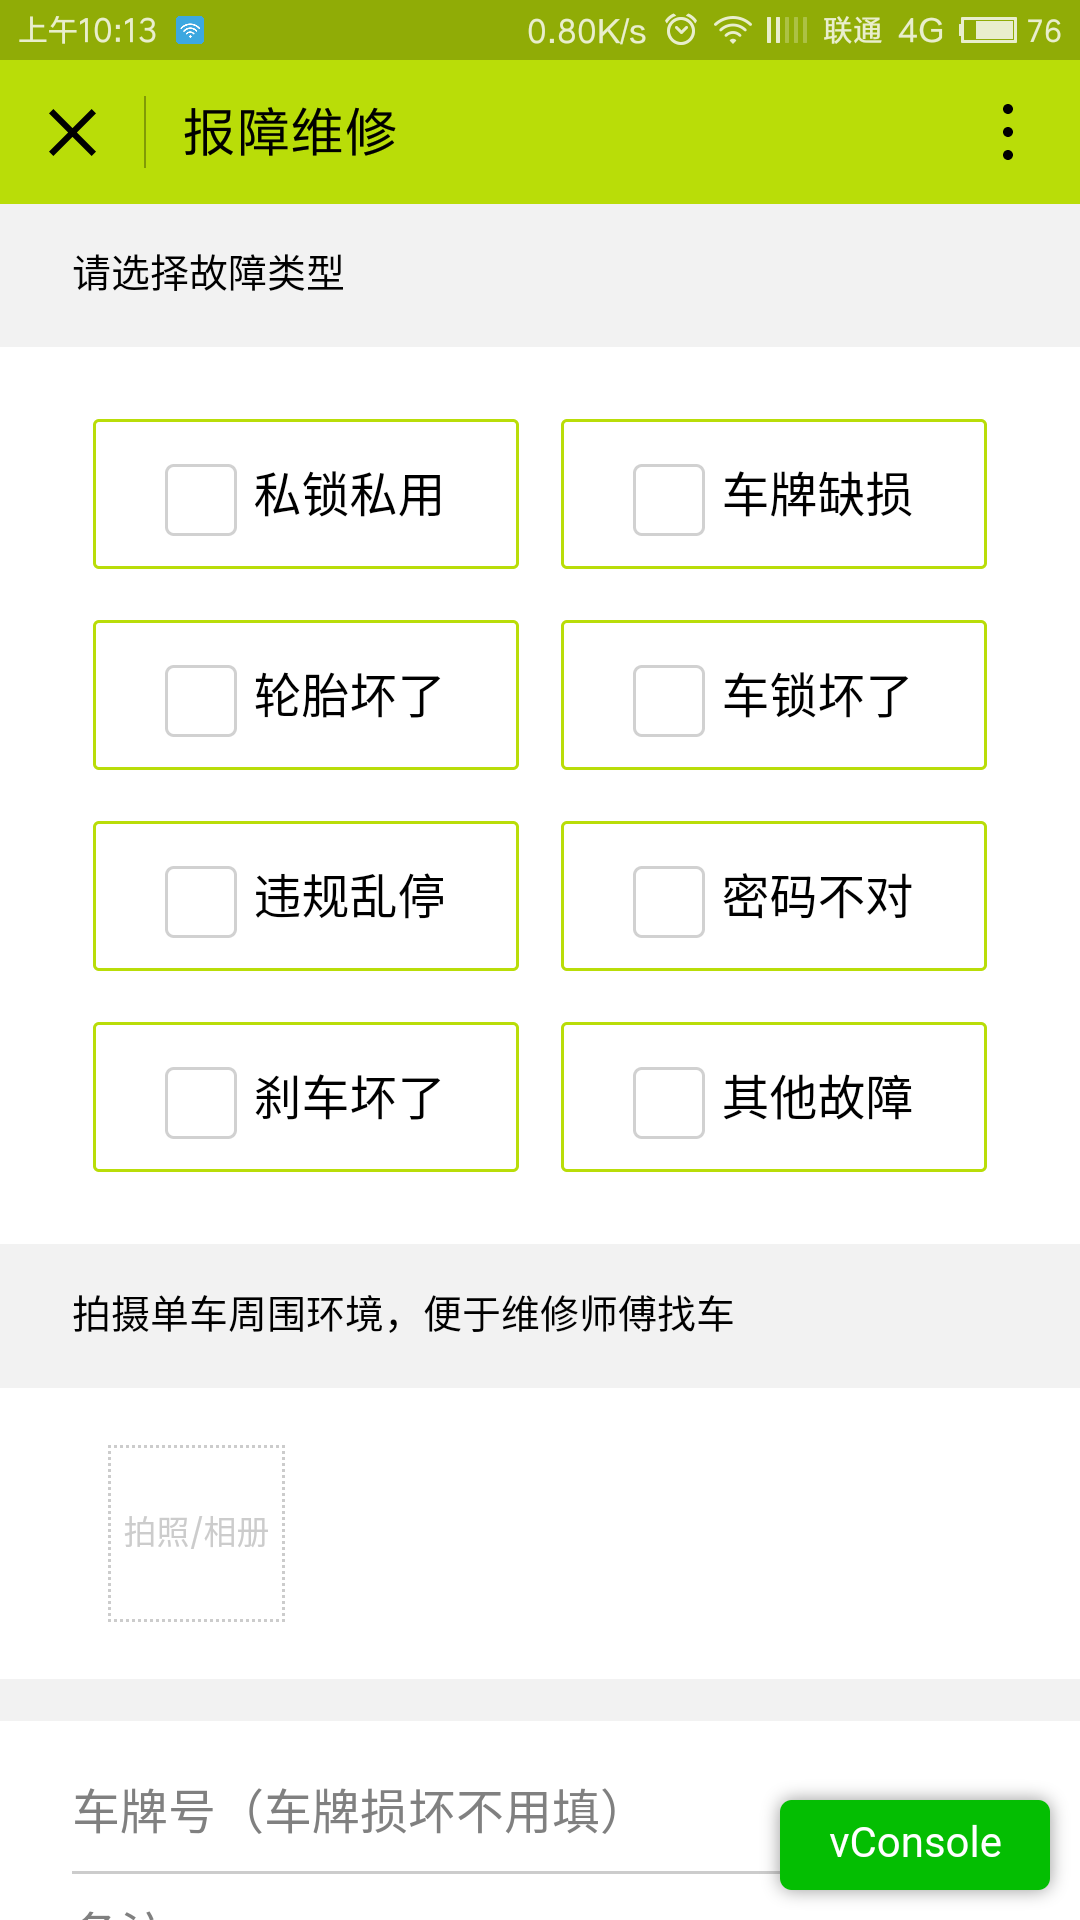
维修报障页1
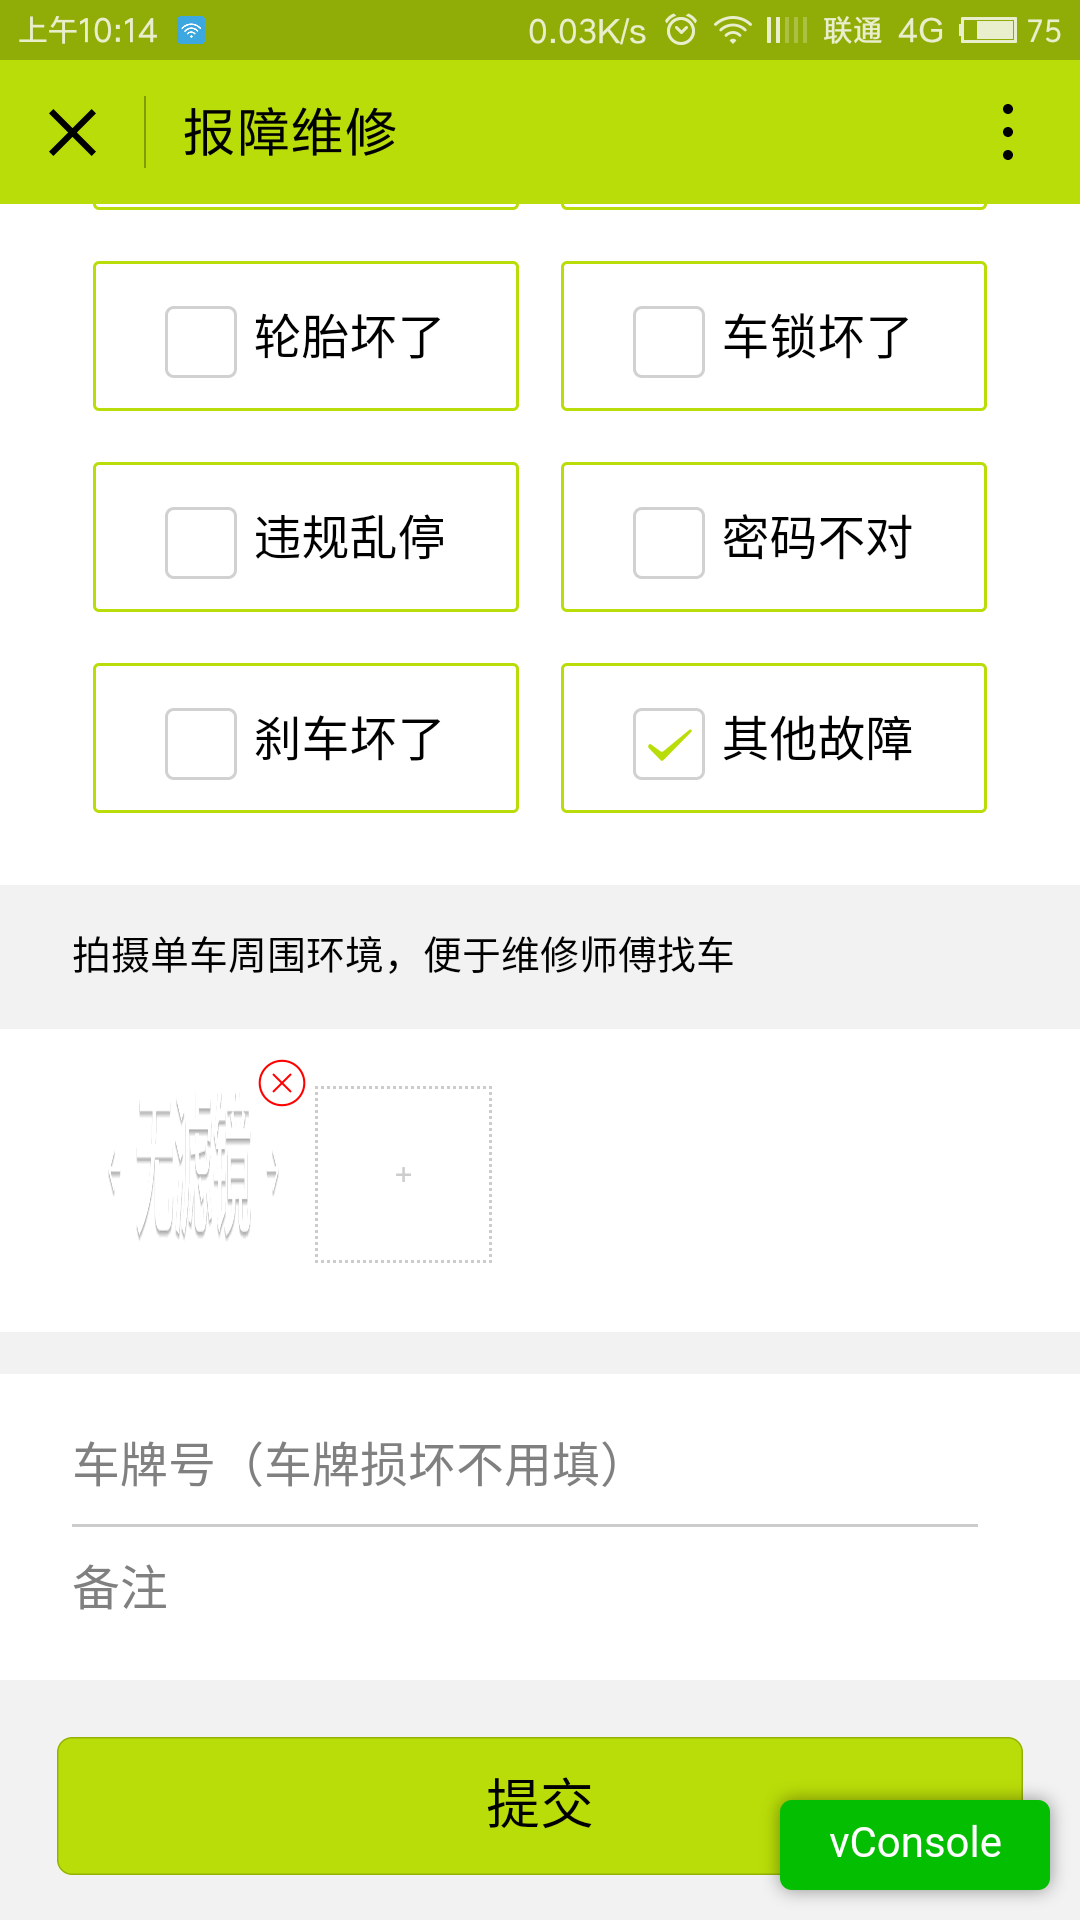
维修报障页2
页面分析:
1.页面可以勾选故障类型,所以需要用到复选框组件;可以选择上传或拍摄图片,所以要使用wx.chooseImage({})选取图片API;可以输入车牌号好备注,所以需要使用input输入组件。
2.勾选类型,选择图片,输入备注信息完成后,后台需要获取这些输入的数据提交到服务器以获得反馈。
3.必须勾选类型和选择周围环境图片才能提交,否则弹窗提示。可以选择多张图片,也可以取消选择的图片。
1.页面结构
<view class="container">
<view class="choose">
<view class="title">请选择故障类型</view>
<checkbox-group bindchange="checkboxChange" class="choose-grids">
<block wx:for="{{itemsValue}}" wx:key="{{item}}">
<view class="grid">
<checkbox value="{{item.value}}" checked="{{item.checked}}" color=
邀请
原作者: 模板之家
来自: 网络收集
| 


