下面由Laravel教程栏目给大家介绍基于Laravel+Vue组件实现文章发布、编辑和浏览功能,希望对需要的朋友有所帮助!我们将基于 Laravel 提供后端接口,基于 Vue.js 作为前端 JavaScript 组件开发框架...
|
下面由Laravel教程栏目给大家介绍基于Laravel+Vue组件实现文章发布、编辑和浏览功能,希望对需要的朋友有所帮助!
我们将基于 Laravel 提供后端接口,基于 Vue.js 作为前端 JavaScript 组件开发框架,基于 Bootstrap 作为 CSS 框架。 Laravel 后端接口首先,我们基于上篇教程创建的资源控制器 <?php
namespace App\Http\Controllers;
use App\Models\Post;
use Exception;
use Illuminate\Contracts\Foundation\Application;
use Illuminate\Contracts\View\Factory;
use Illuminate\Contracts\View\View;
use Illuminate\Http\Request;
use Illuminate\Http\Response;
use Illuminate\Support\Collection;
use Illuminate\Support\Facades\Auth;
class PostController extends Controller
{
public function __construct()
{
$this->middleware('auth')->except('index', 'all', 'show', 'data');
}
/**
* Display a listing of the resource.
*
* @return Application|Factory|View|Response|\Illuminate\View\View
*/
public function index()
{
return view('posts.index', ['pageTitle' => '文章列表页']);
}
/**
* Show the form for creating a new resource.
*
* @return Application|Factory|View|Response|\Illuminate\View\View
*/
public function create()
{
return view('posts.create', ['pageTitle' => '发布新文章']);
}
/**
* Store a newly created resource in storage.
*
* @param Request $request
* @return array
*/
public function store(Request $request)
{
$data = $request->validate([
'title' => 'required|max:128',
'content' => 'required'
]);
$post = new Post($data);
$post->status = 1;
$post->user_id = Auth::user()->id;
if ($post->save()) {
return ['success' => true, 'message' => '文章发布成功'];
}
return ['success' => false, 'message' => '保存文章数据失败'];
}
/**
* Display the specified resource.
*
* @param Post $post
* @return Application|Factory|View|Response|\Illuminate\View\View
*/
public function show(Post $post)
{
return view('posts.show', ['id' => $post->id, 'pageTitle' => $post->title]);
}
/**
* Show the form for editing the specified resource.
*
* @param Post $post
* @return Application|Factory|View|Response|\Illuminate\View\View
*/
public function edit(Post $post)
{
return view('posts.edit', ['pageTitle' => '编辑文章', 'id' => $post->id]);
}
/**
* Update the specified resource in storage.
*
* @param Request $request
* @param Post $post
* @return array
*/
public function update(Request $request, Post $post)
{
$data = $request->validate([
'title' => 'required|max:128',
'content' => 'required'
]);
$post->fill($data);
$post->status = 1;
if ($post->save()) {
return ['success' => true, 'message' => '文章更新成功'];
}
return ['success' => false, 'message' => '更新文章数据失败!'];
}
/**
* Remove the specified resource from storage.
*
* @param Post $post
* @return array
* @throws Exception
*/
public function destroy(Post $post)
{
if ($post->delete()) {
return ['success' => true, 'message' => '文章删除成功'];
}
return ['success' => false, 'message' => '删除文章失败'];
}
/**
* 获取所有文章数据
*
* @return Collection
*/
public function all()
{
return Post::orderByDesc('created_at')->get();
}
/**
* 获取单个文章数据
*
* @param Post $post
* @return Post
*/
public function data(Post $post)
{
$post->author_name = $post->author->name;
return $post;
}
}除了 Laravel 资源控制器自带的方法之外,我们额外提供了 use App\Http\Controllers\PostController;
Route::get('posts/all', [PostController::class, 'all']);
Route::get('posts/{post}/data', [PostController::class, 'data']);
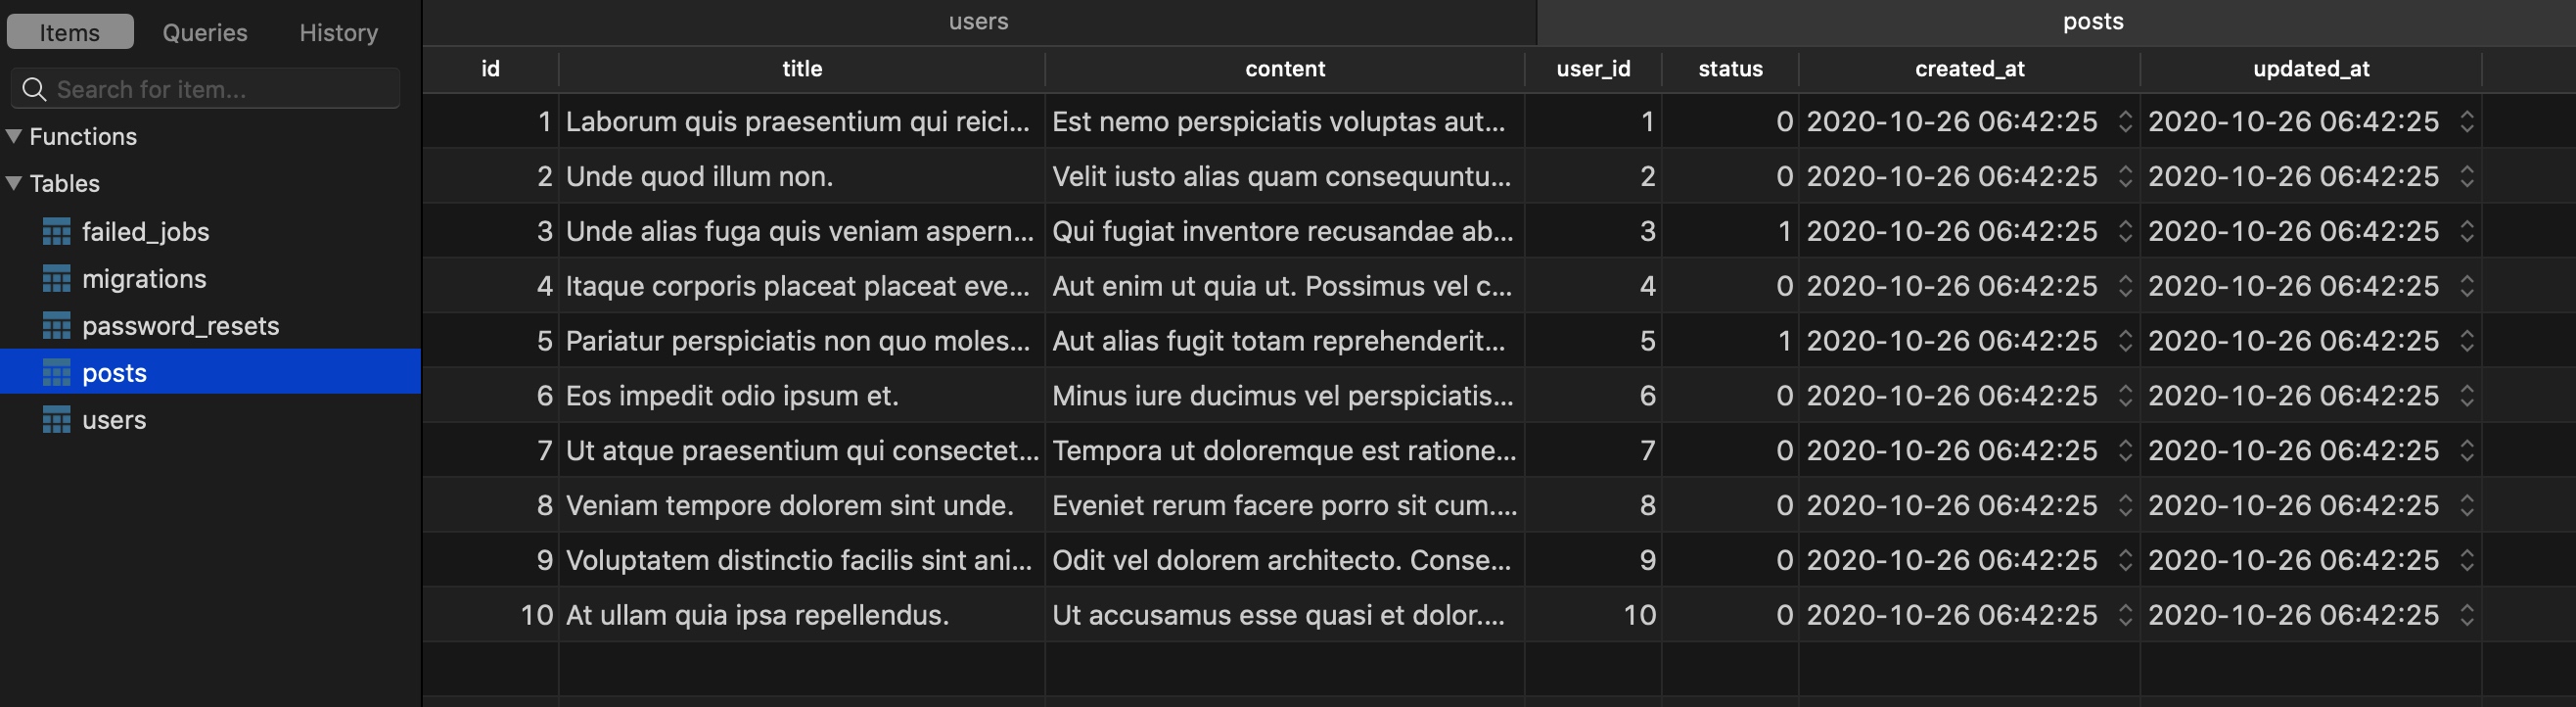
Route::resource('posts', PostController::class);注意这里我们使用了 Laravel 路由提供的隐式模型绑定功能快速获取模型实例。此外,相应的视图模板路径也做了调整,我们马上会介绍这些视图模板文件。 通过填充器填充测试数据如果你在上篇教程填充的测试数据基础上新增过其他数据,可以运行 如果你不想查看返回实例数据格式的细节,可以在自带填充器 <?php
namespace Database\Seeders;
use App\Models\Post;
use Illuminate\Database\Seeder;
class DatabaseSeeder extends Seeder
{
/**
* Seed the application's database.
*
* @return void
*/
public function run()
{
// \App\Models\User::factory(10)->create();
Post::factory(10)->create();
}
}然后运行
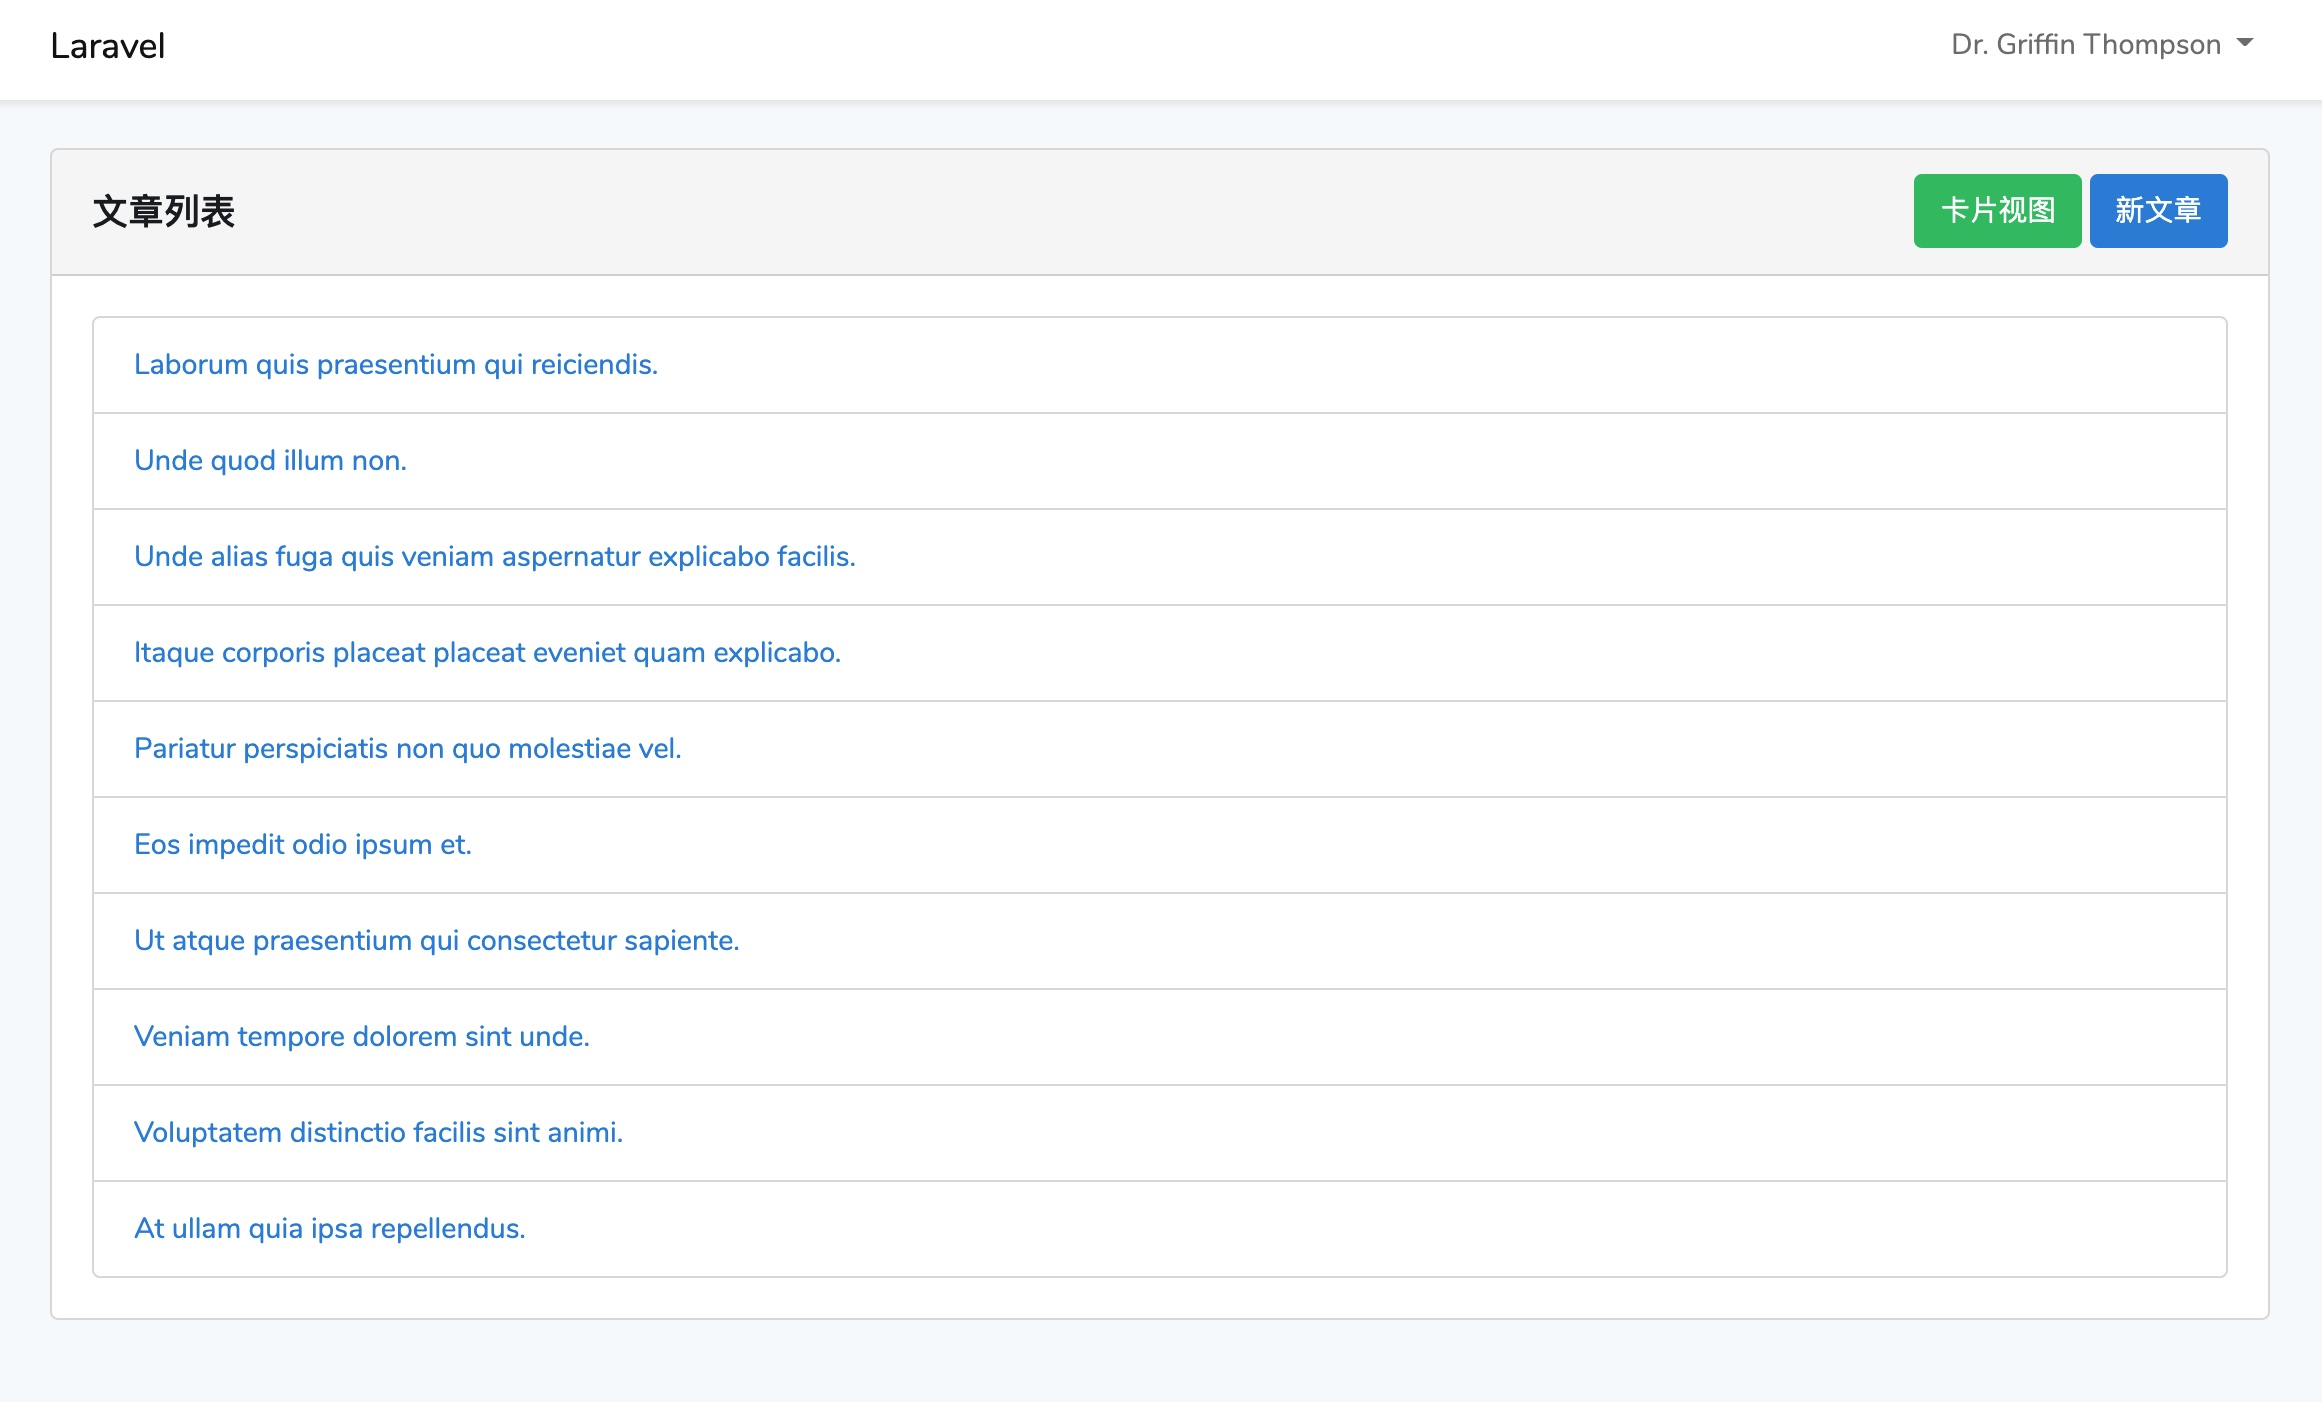
通过模板继承重构视图模板由于我们使用的是 Laravel 提供的 不同页面设置不同标题我们前面在 <title>{{ $pageTitle ?? config('app.name', 'Laravel') }}</title>文章列表视图接下来,将原来的文章相关视图文件都移动到 @extends('layouts.app')
@section('content')
<p class="container">
<post-list></post-list>
</p>
@endsection文章发布视图将原来的 @extends('layouts.app')
@section('content')
<p class="container">
<p class="row justify-content-center">
<post-form title="发布新文章" action="create" url="{{ route('posts.store') }}">
</post-form>
</p>
</p>
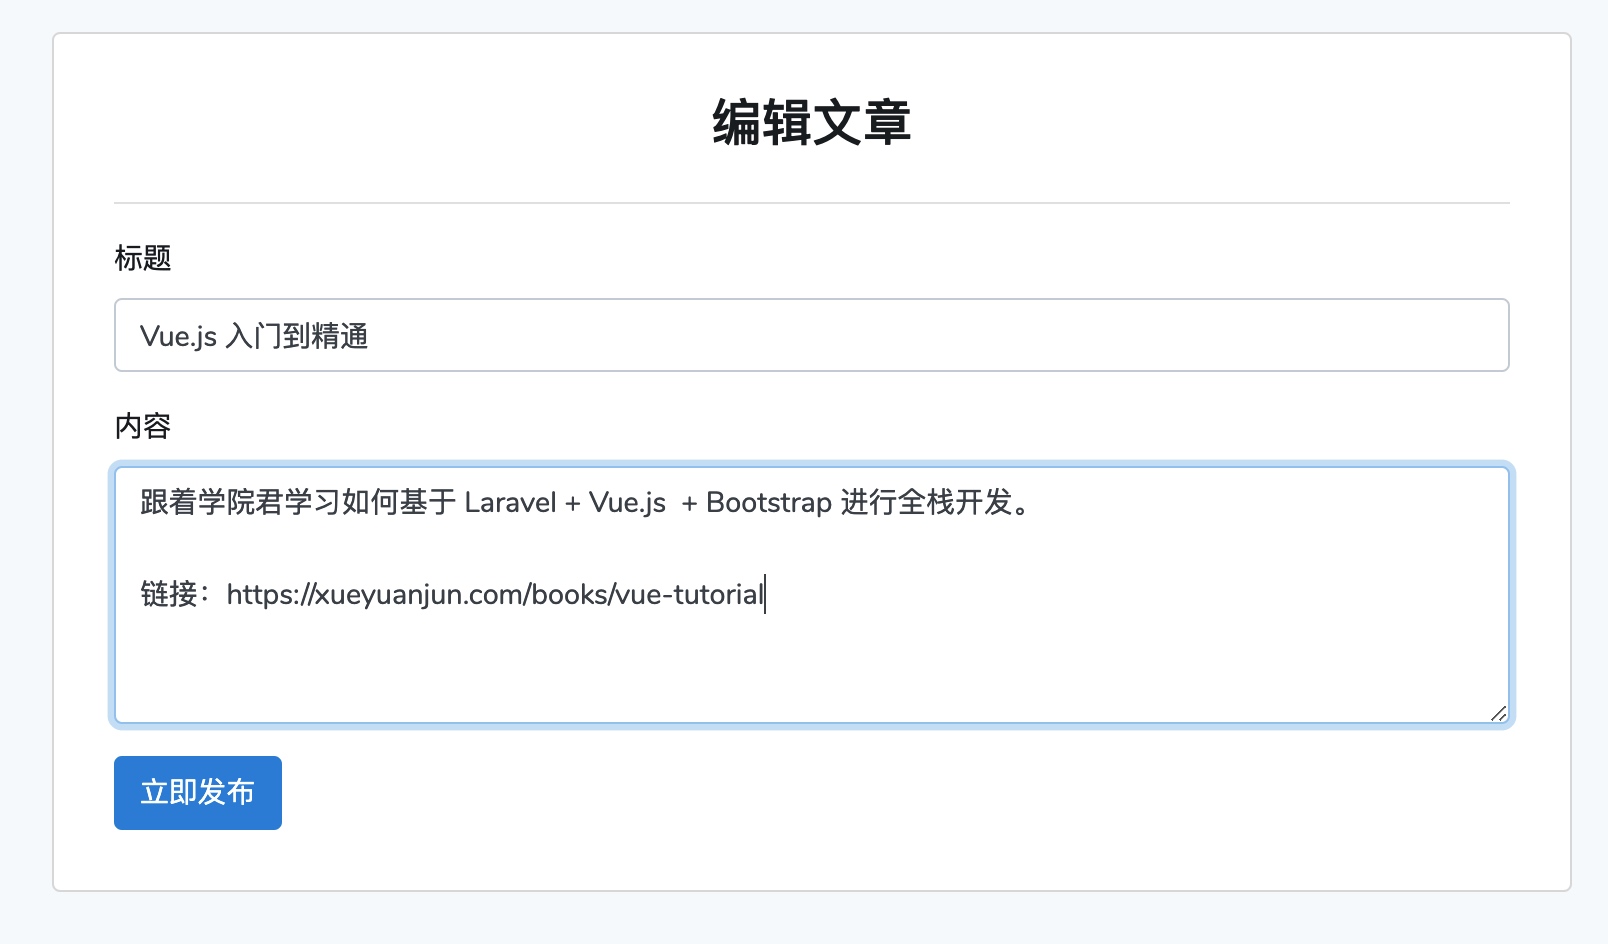
@endsection由于文章发布和编辑表单共用一个 Vue 表单组件,所以我们这里额外传递了一些 props 属性到组件模板,包括表单标题( 文章编辑视图在 @extends('layouts.app')
@section('content')
<p class="container">
<p class="row justify-content-center">
<post-form title="编辑文章" action="update" id="{{ $id }}" url="{{ route('posts.update', ['post' => $id]) }}">
</post-form>
</p>
</p>
@endsection同样也使用 文章详情页视图后面单独介绍。 重构 Vue 表单组件代码为了适配文章编辑表单,以及后端接口返回数据格式的调整,我们需要修改 Vue 表单组件实现代码: <template>
<FormSection @store="store">
<template slot="title">{{ title }}</template>
<template slot="input-group">
<p class="form-group">
<Label name="title" label="标题"></Label>
<InputText name="title" v-model="form.title" @keyup="clear('title')"></InputText>
<ErrorMsg :error="form.errors.get('title')"></ErrorMsg>
</p>
<p class="form-group">
<Label name="content" label="内容"></Label>
<TextArea name="content" v-model="form.content" @keyup="clear('content')"></TextArea>
<ErrorMsg :error="form.errors.get('content')"></ErrorMsg>
</p>
</template>
<template slot="action">
<Button type="submit">立即发布</Button>
</template>
<template slot="toast">
<ToastMsg :success="form.success" :validated="form.validated">
{{ form.message }}
</ToastMsg>
</template>
</FormSection>
</template>
<script>
import FormSection from './form/FormSection';
import InputText from './form/InputText';
import TextArea from './form/TextArea';
import Button from './form/Button';
import ToastMsg from './form/ToastMsg';
import Label from "./form/Label";
import ErrorMsg from "./form/ErrorMsg";
export default {
components: {FormSection, InputText, TextArea, Label, ErrorMsg, Button, ToastMsg},
props: ['title', 'url', 'action', 'id'],
data() {
return {
form: new Form({
title: '',
content: ''
})
}
},
mounted() {
let post_id = Number(this.id);
if (this.action === 'update' && post_id > 0) {
this.load(post_id);
}
},
methods: {
load(id) {
this.form.title = '加载中...';
this.form.content = '加载中...';
let url = '/posts/' + id + '/data';
axios.get(url).then(resp => {
this.form.title = resp.data.title;
this.form.content = resp.data.content;
}).catch(error => {
alert('从服务端初始化表单数据失败');
});
},
store() {
if (this.action === 'create') {
this.form.post(this.url)
.then(data => {
// 发布成功后跳转到列表页
window.location.href = '/posts';
})
.catch(data => console.log(data)); // 自定义表单提交失败处理逻辑
} else {
this.form.put(this.url)
.then(data => {
// 更新成功后跳转到详情页
window.location.href = '/posts/' + this.id;
})
.catch(data => console.log(data)); // 自定义表单提交失败处理逻辑
}
},
clear(field) {
this.form.errors.clear(field);
}
}
}
</script>文章发布和编辑页面需要通过标题予以区分,所以我们通过 对于文章编辑表单,首先,我们会根据父级作用域传递的 现在后端接口可以自动获取当前认证用户的 ID,所以 文章创建和编辑对应的请求方式是不一样的,操作成功后处理逻辑也是不一样的(前者重定向到列表页,后者重定向到详情页),所以根据 此外,由于后端对表单数据进行验证后,保存数据阶段依然可能失败,所以前端提交表单后返回的响应状态码为 200 并不表示表单提交处理成功,还需要借助响应实体(JSON 格式)中的
<style scoped>
.alert {
    margin-top: 10px;
}
</style>

<template>
    <p class="alert" :class="{'alert-success': success, 'alert-danger': !success}" role="alert" v-show="validated">
        <slot></slot>
    </p>
</template>

<script>
export default {
    props: ['validated', 'success']
}
</script>
可以看到,如果表单提交处理成功(依然基于父级作用域传递的 class Form {
constructor(data) {
...
this.validated = false;
}
...
/**
* 表单提交处理
*
* @param {string} url
* @param {string} method
*/
submit(url, method) {
return new Promise((resolve, reject) => {
axios[method](url, this.data())
.then(response => {
this.onSuccess(response.data);
this.validated = true;
if (this.success === true) {
resolve(response.data);
} else {
reject(response.data);
}
})
.catch(error => {
this.onFail(error.response.data.errors);
reject(error.response.data);
});
});
}
/**
* 处理表单提交成功
*
* @param {object} data
*/
onSuccess(data) {
this.success = data.success;
this.message = data.message;
this.reset();
}
...
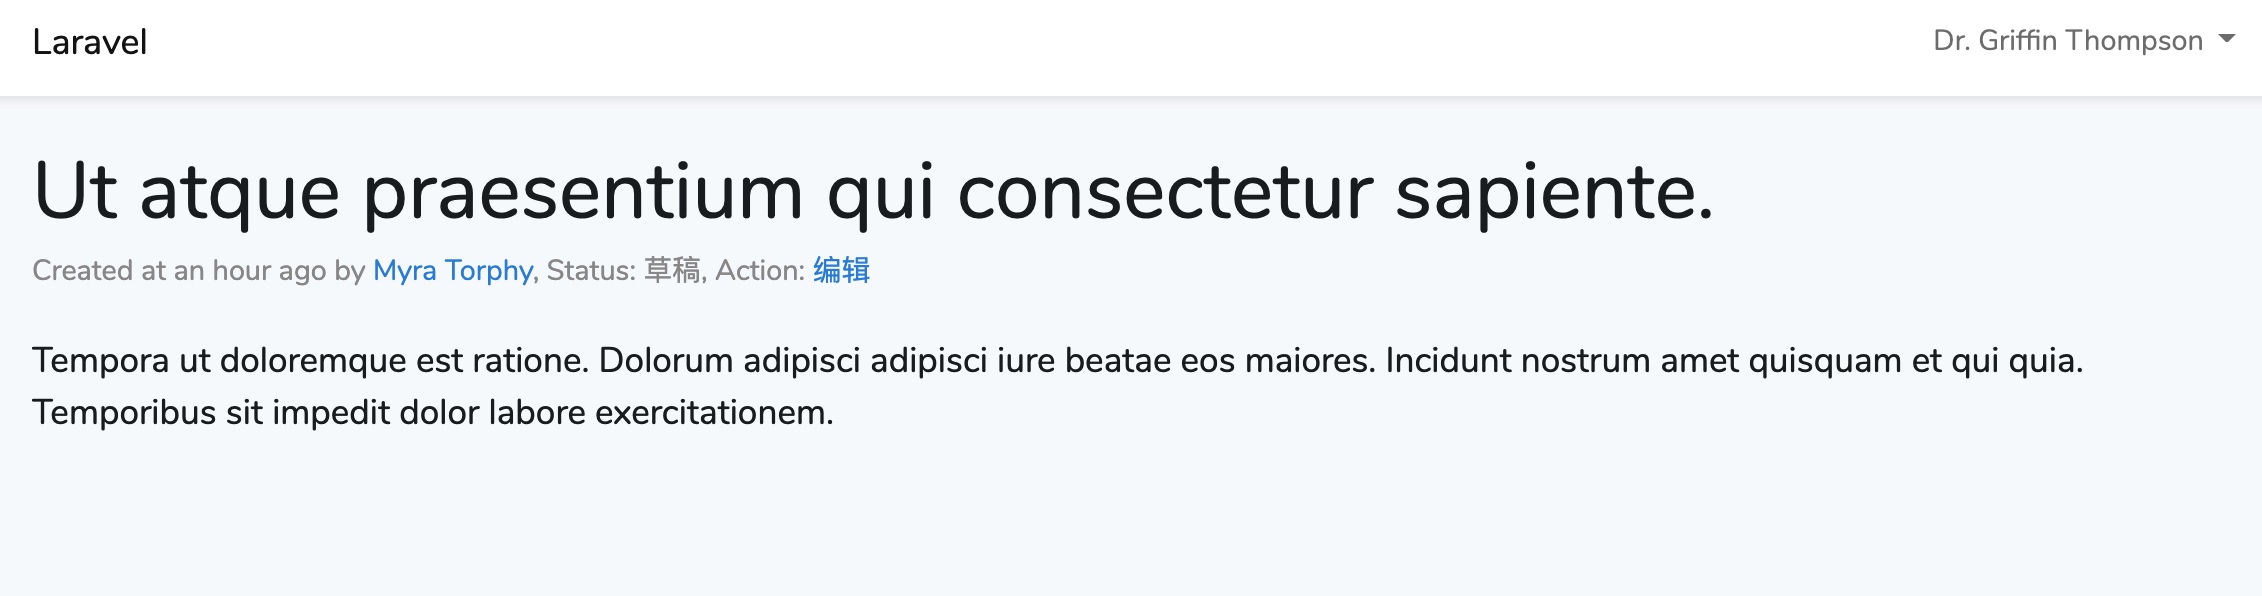
}这样一来,文章发布和编辑共用的 Vue 表单组件就重构好了。 文章详情页视图和 Vue 组件实现我们接着来实现文章详情页。 PostDetail 组件在 <style scoped>
.post-detail {
width: 100%;
}
.post-title {
margin-bottom: .25rem;
font-size: 2.5rem;
}
.post-meta {
margin-bottom: 1.25rem;
color: #999;
}
.post-content {
font-size: 1.1rem;
font-weight: 400;
line-height: 1.5;
color: #212529;
}
</style>
<template>
<p class="spinner-border" role="status" v-if="!loaded">
<span class="sr-only">Loading...</span>
</p>
<p class="post-detail" v-else>
<h2 class="post-title">{{ title }}</h2>
<p class="post-meta">
Created at {{ created_at | diff_for_human }} by <a href="#">{{ author_name }}</a>,
Status: {{ status | post_status_readable }},
Action: <a :href="'/posts/' + id + '/edit'">编辑</a>
</p>
<p class="post-content">
{{ content }}
</p>
</p>
</template>
<script>
export default {
props: ['post_id'],
data() {
return {
id: this.post_id,
title: '',
content: '',
status: '',
author_name: '',
created_at: '',
loaded: false
}
},
mounted() {
if (!this.loaded) {
this.load(Number(this.id));
}
},
methods: {
load(id) {
axios.get('/posts/' + this.id + '/data').then(resp => {
this.title = resp.data.title;
this.content = resp.data.content;
this.status = resp.data.status;
this.author_name = resp.data.author_name;
this.created_at = resp.data.created_at;
this.loaded = true;
}).catch(err => {
alert('加载文章数据失败');
});
}
}
}
</script>这个组件功能比较简单,在 这里我们还使用了过滤器对数据进行格式化,日期过滤器已经是全局的了,状态过滤器之前是本地的,这里我们将其从文章列表卡片组件 Vue.filter('post_status_readable', status => {
switch(status) {
case 0:
return '草稿';
case 1:
return '已发布';
default:
return '未知状态';
}
});然后就可以在任何 Vue 组件中调用它了( 在 Vue.component('post-detail', require('./components/PostDetail.vue').default);文章详情页视图文件再到 @extends('layouts.app')
@section('content')
<p class="container">
<post-detail post_id="{{ $id }}"></post-detail>
</p>
@endsection优化文章列表组件最后,我们到文章列表组件中新增一个发布文章入口。 打开子组件 <style scoped>
.card-header h5 {
margin-top: 0.5em;
display: inline-block;
}
.card-header .float-right {
float: right;
}
</style>
<template>
<p class="card">
<p class="card-header">
<h5><slot name="title"></slot></h5>
<p class="float-right">
<button class="btn btn-success view-mode" @click.prevent="switch_view_mode">
{{ view.switch_to }}
</button>
<slot name="more-actions"></slot>
</p>
</p>
...然后在 <style scoped>
.post-list {
width: 100%;
}
</style>
<template>
<p class="post-list">
<ListSection :view_mode="view_mode" @view-mode-changed="change_view_mode">
<template #title>文章列表</template>
<template #more-actions>
<a href="/posts/create" class="btn btn-primary">新文章</a>
</template>
<template v-if="view_mode === 'list'">
<ListItem v-for="post in posts" :key="post.id" :url="'/posts/' + post.id">
{{ post.title }}
</ListItem>
</template>
...顺便也为文章列表所有文章设置详情页链接, <a :href="'/posts/' + post.id" class="btn btn-primary"><slot name="action-label"></slot></a> 至此,我们就完成了文章列表、发布、编辑和详情页的所有前后端功能代码编写。 整体测试如果你已经在本地运行了
点击任意文章链接,即可进入文章详情页,加载数据成功之前,会有如下动态加载效果:
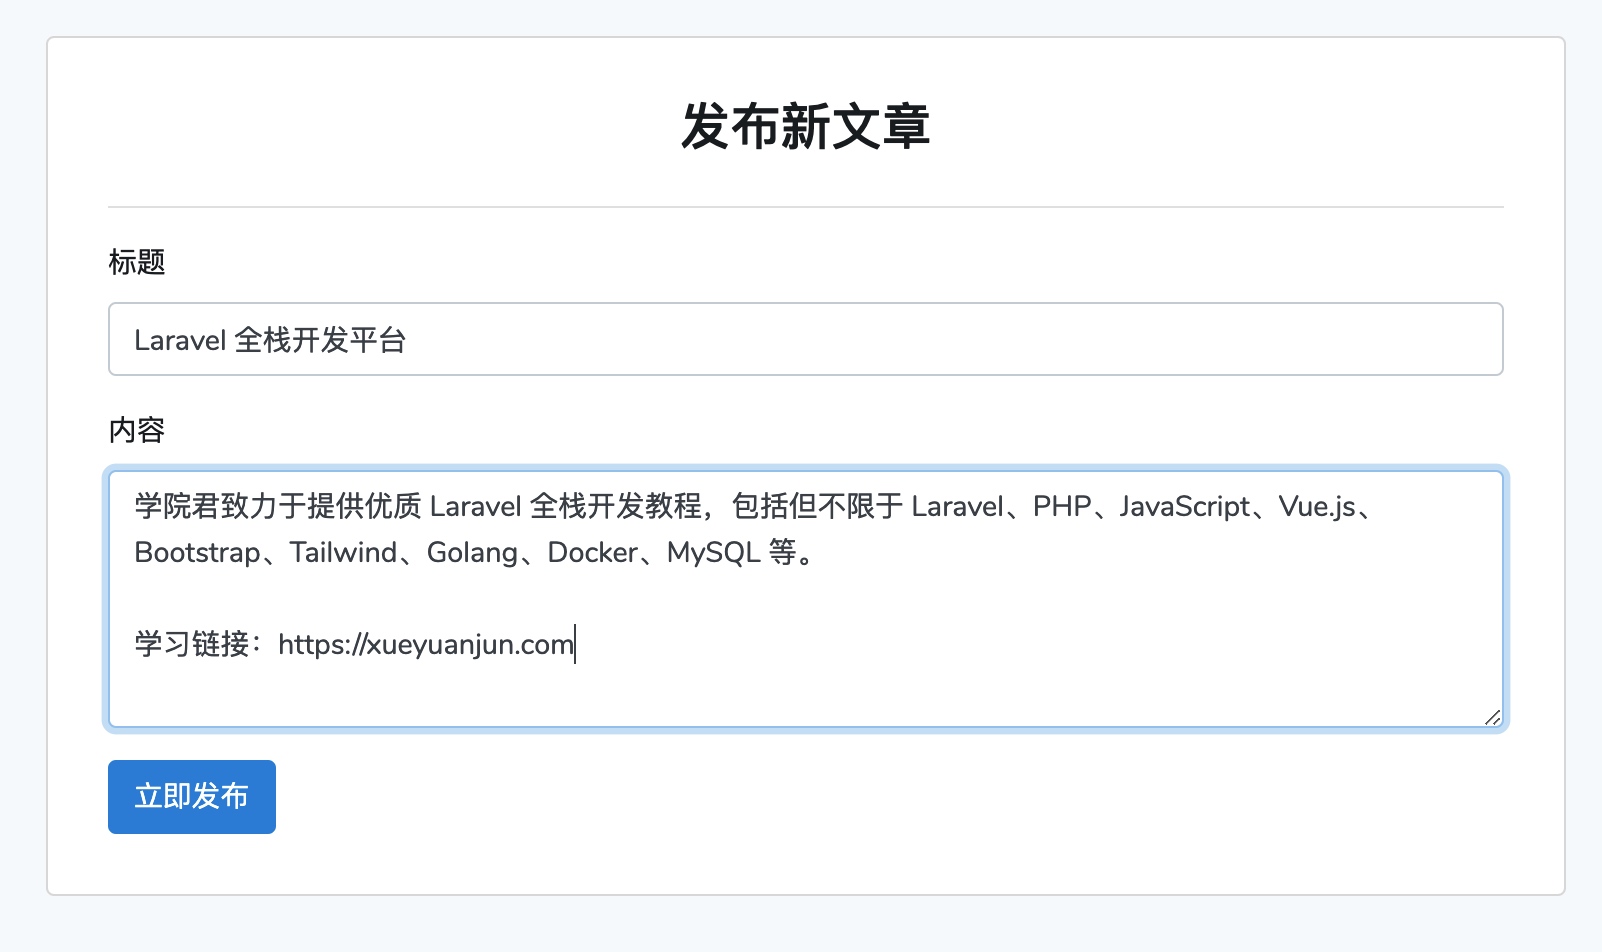
你可以点击「编辑」链接对这篇文章进行编辑:
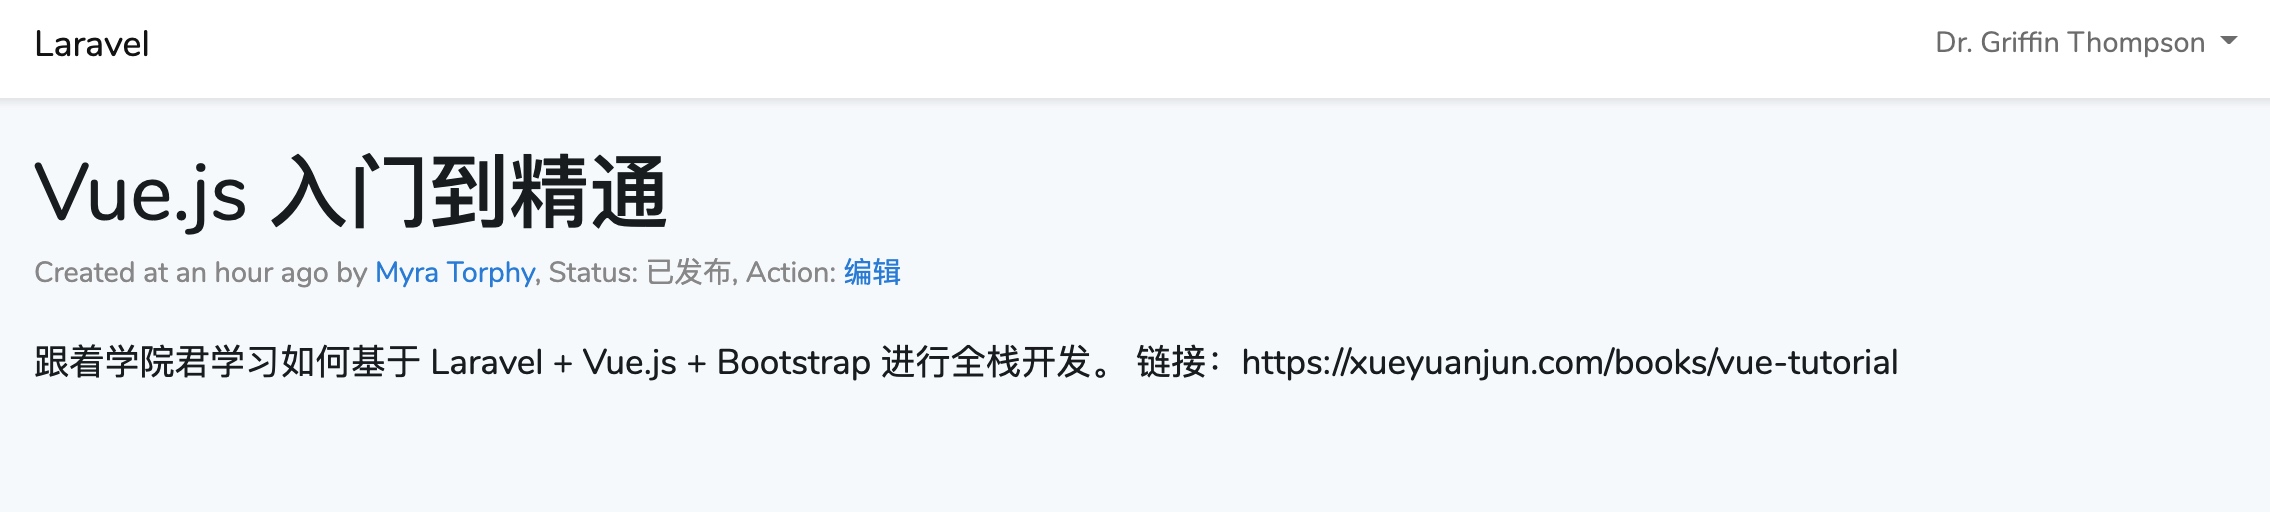
更新成功后,会跳转到文章详情页,对应字段均已更新,并且状态也从草稿变成了已发布:
当然,文章发布和编辑功能需要用户处于已登录状态(目前未做权限验证),如果未登录的话,点击编辑和新文章按钮会先跳转到登录页面(该功能由
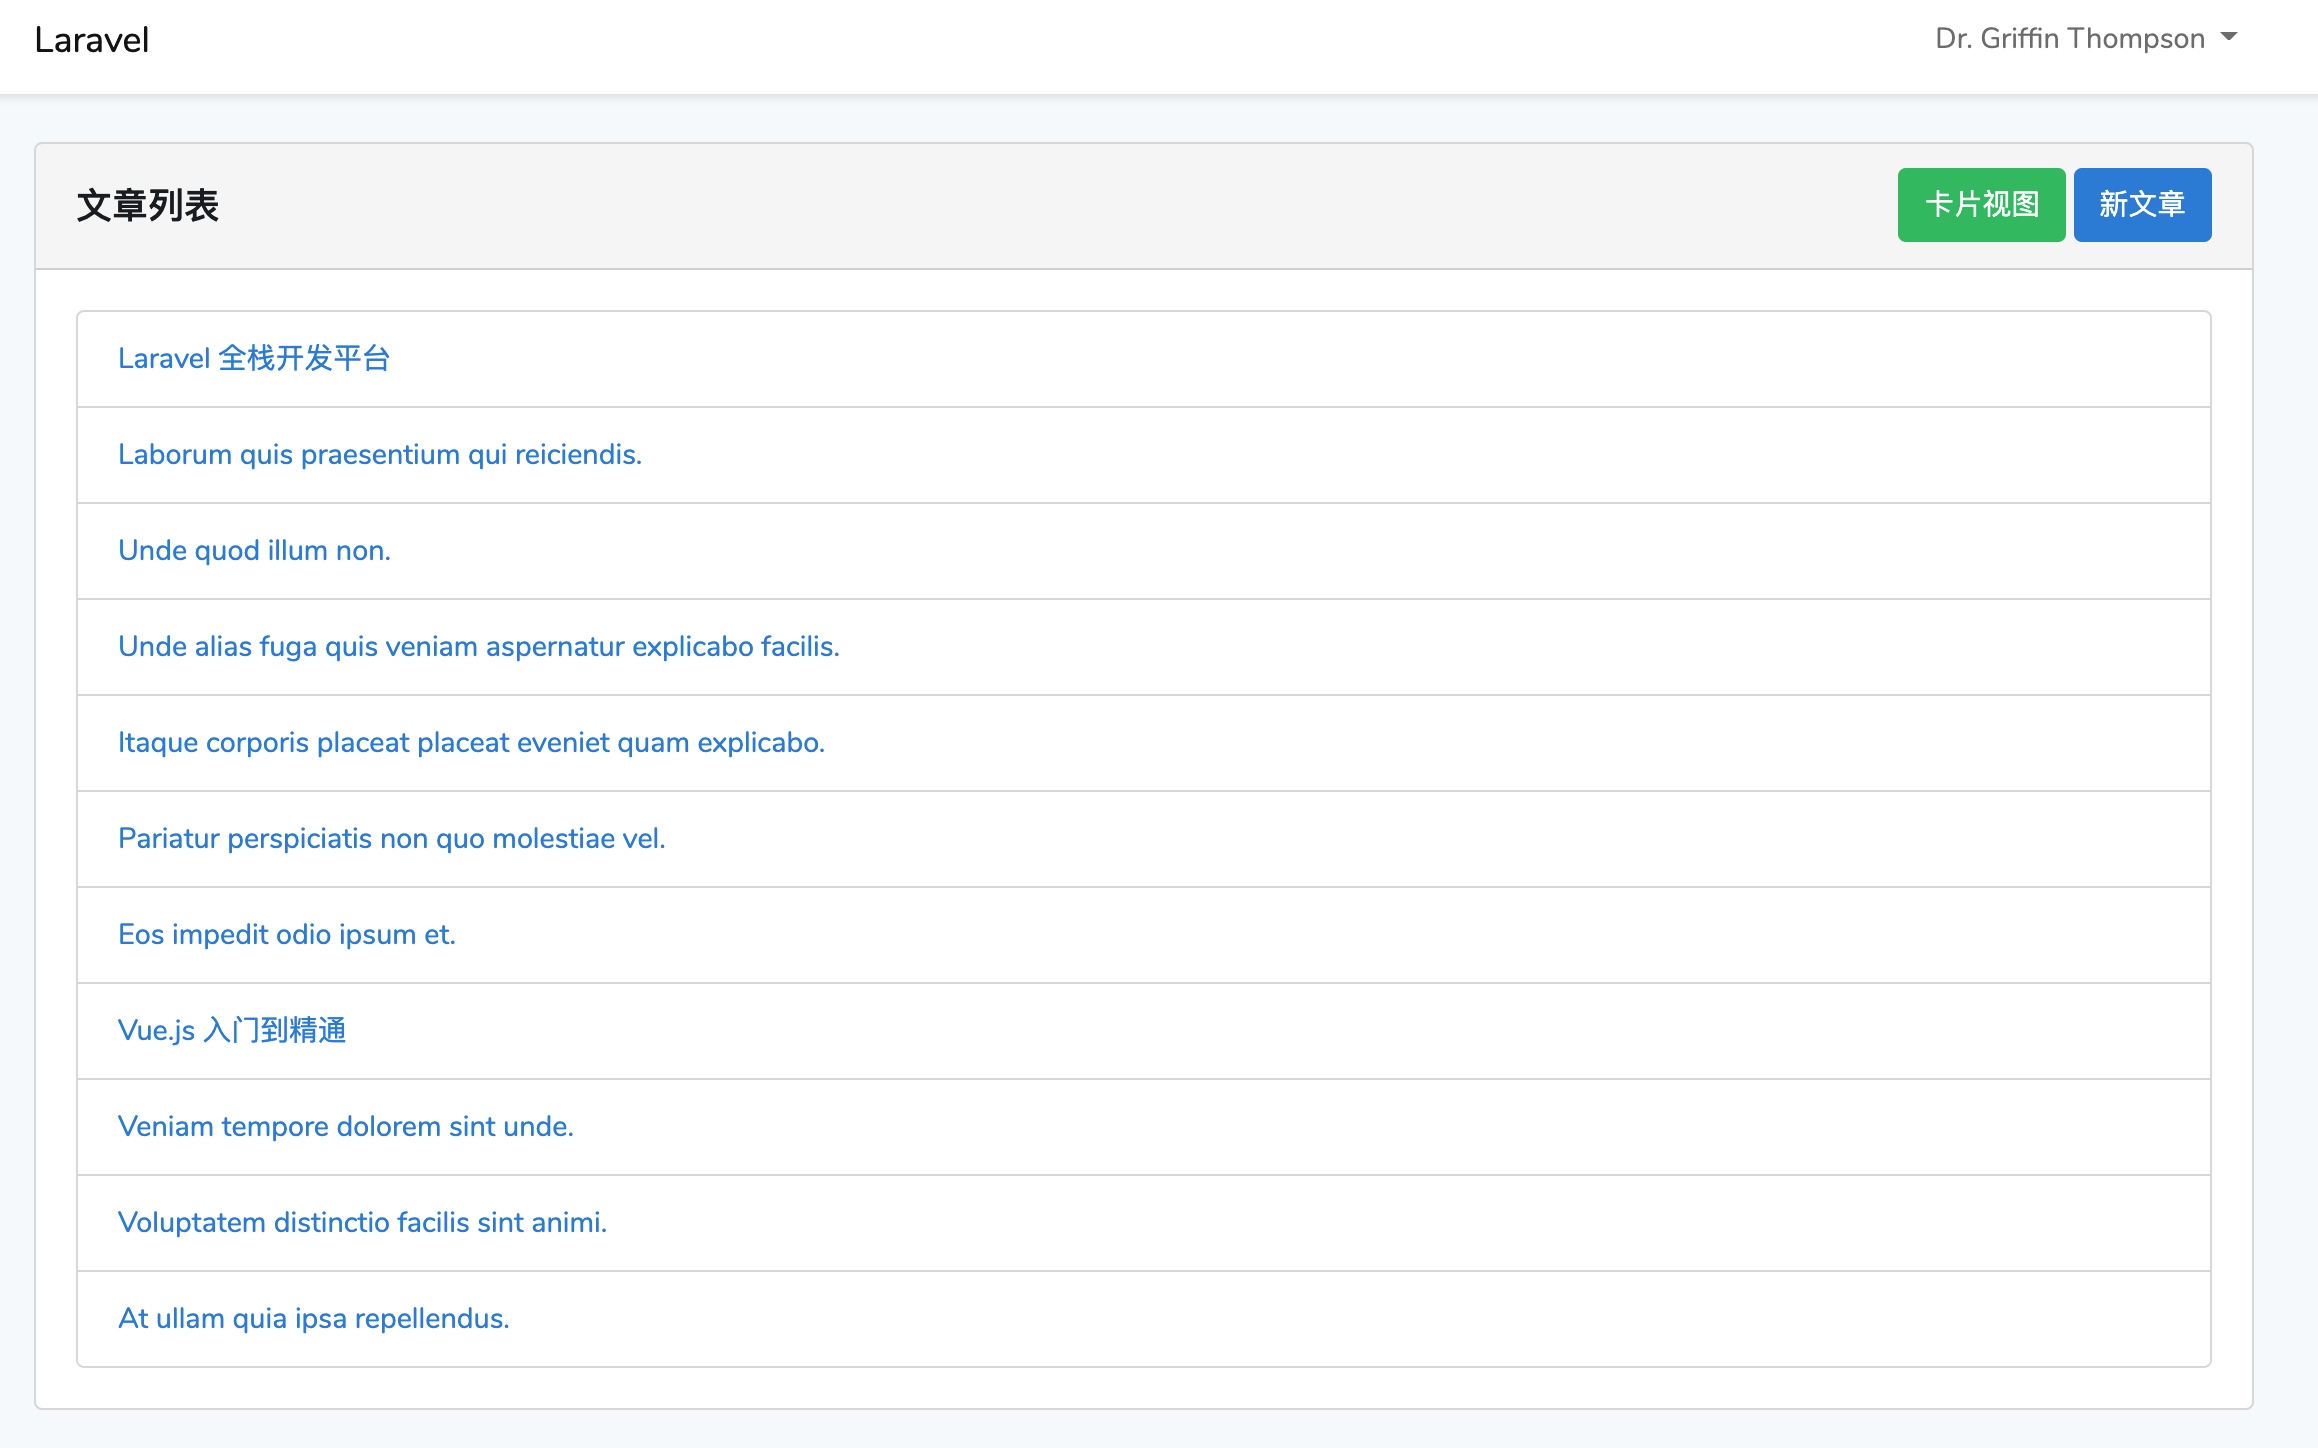
发布成功后,页面会跳转到文章列表页,并在列表中出现刚刚创建的文章:
增删改查还剩下一个「删」,下篇教程,就来给大家演示文章删除功能实现,为什么单独介绍呢,因为我想结合删除功能演示基于 Vue 组件的模态框、对话框以及过渡效果的实现。 以上就是教你基于Laravel+Vue组件实现文章发布、编辑和浏览功能的详细内容,更多请关注模板之家(www.mb5.com.cn)其它相关文章! |